Using dnSpyEx to patch basic applications
Introduction
In the modern age, Windows reigns amongst the most used systems. Such is this fact that also many developers dedicate exclusively to the .NET framework.
When debugging, researching and reversing .NET apps, we will find ourselves often wondering how to speed up some processes, skip product key checks, fix bugs on the fly or even adding custom features to closed-source software.
In this post we will navigate through the basics of patching/modifying .NET applications (based in C#) to accomplish some of these tasks.
Disclaimer
This is only for research and educational purposes. This does not aim in any way to encourage piracy or any other malicious intent against any kind of software.
Requirements
- dnSpyEx (fork of dnSpy)
Using dnSpyEx to patch basic applications
This section aims to work as an introduction to dnSpy and how to modify simple, not-bundled, .NET apps.
The code we will be using as a demonstration is as follows:
string correctPassword = "secret123";

Console.WriteLine("Please enter the password:");
string userInput = Console.ReadLine();

if (userInput == correctPassword)
{
    Console.WriteLine("Correct");
}
else
{
    Console.WriteLine("Wrong");
}
After compiling, we will be greeted with a bunch of files, such as an .exe file and .dll file under the bin/Debug/net9.0/ folder with some other files.
Compilation structure
Unless we “bundle” our apps, the produced EXE file will basically be a launcher for the DLL file, which will contain the real .NET code.
Assuming we do not have any access to the source code, we would only see the EXE and the DLL. If we check the strings with any other application it would be easy to find the password. For demonstration purposes we will force the password to be correct instead of just peeking it.
Opening it with dnSpy
Let’s drop both files on dnSpy now. We will see the following:
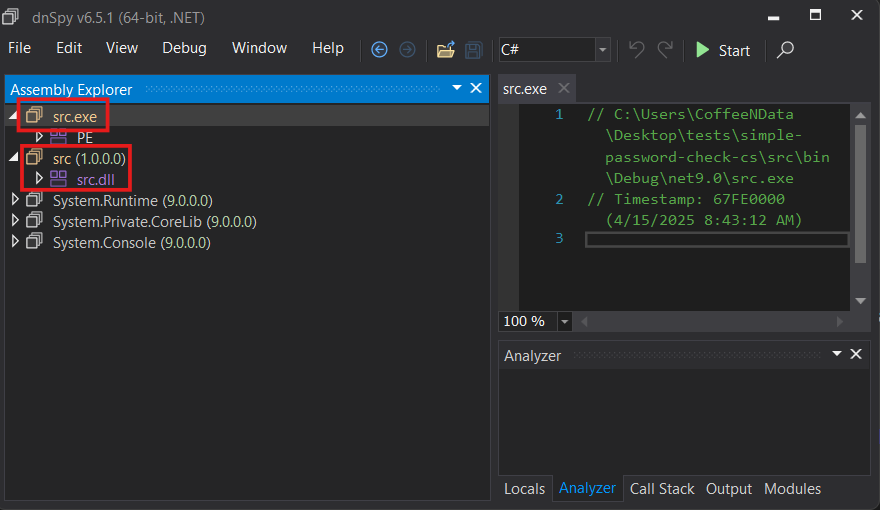
We can see dnSpy didn’t detect the EXE file, but only the DLL. This confirms the information above.
Lets dig in deeper. We will find the main under src/src.dll/-/Program/<Main>. Now we can see the recovered code with some extra compiler-generated artifacts.
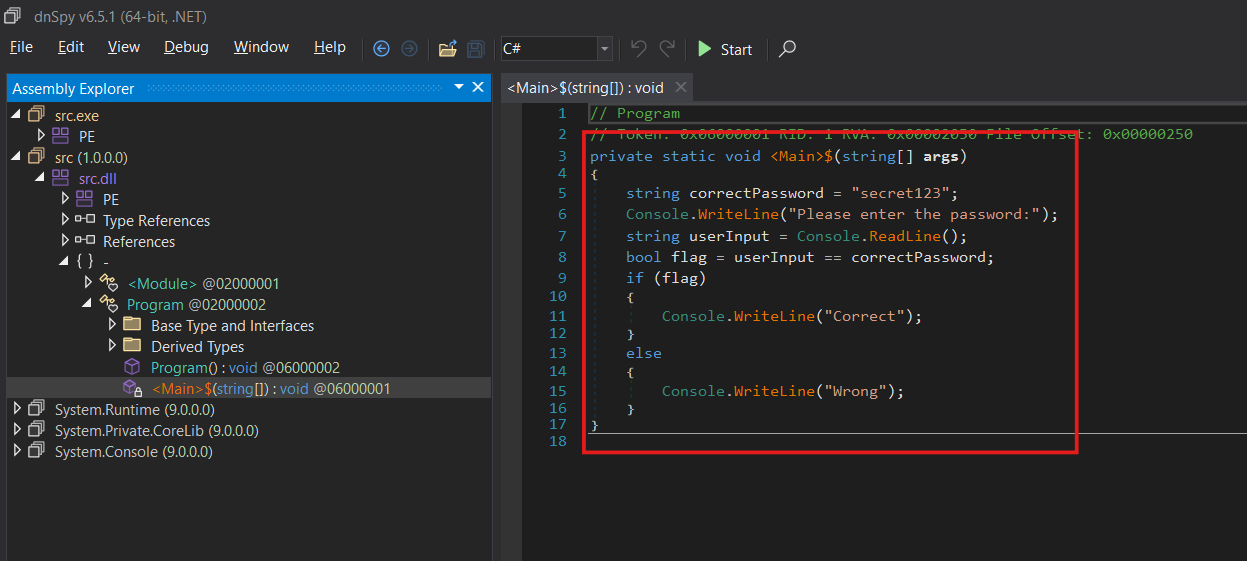
We are able to see the password, but this will not be the case under real conditions. In a realistic environment, we would search all the code to find the “Please enter the password” text, so we can quickly find the authentication logic. We will dig further into this later. We can now modify the code to force the condition on line 8 to be always true.
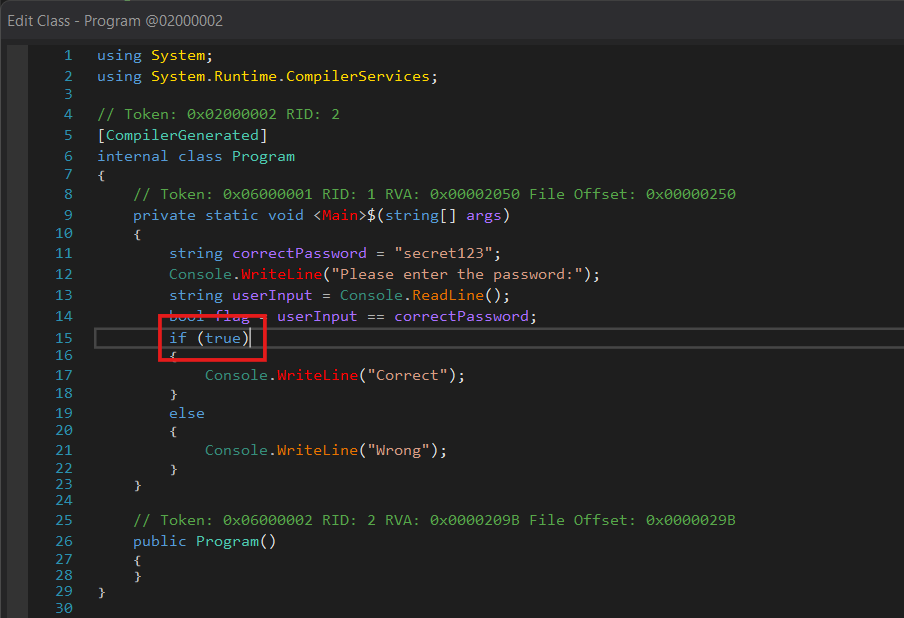
We now have changed the condition to always be true. In theory this should work, but on practice:
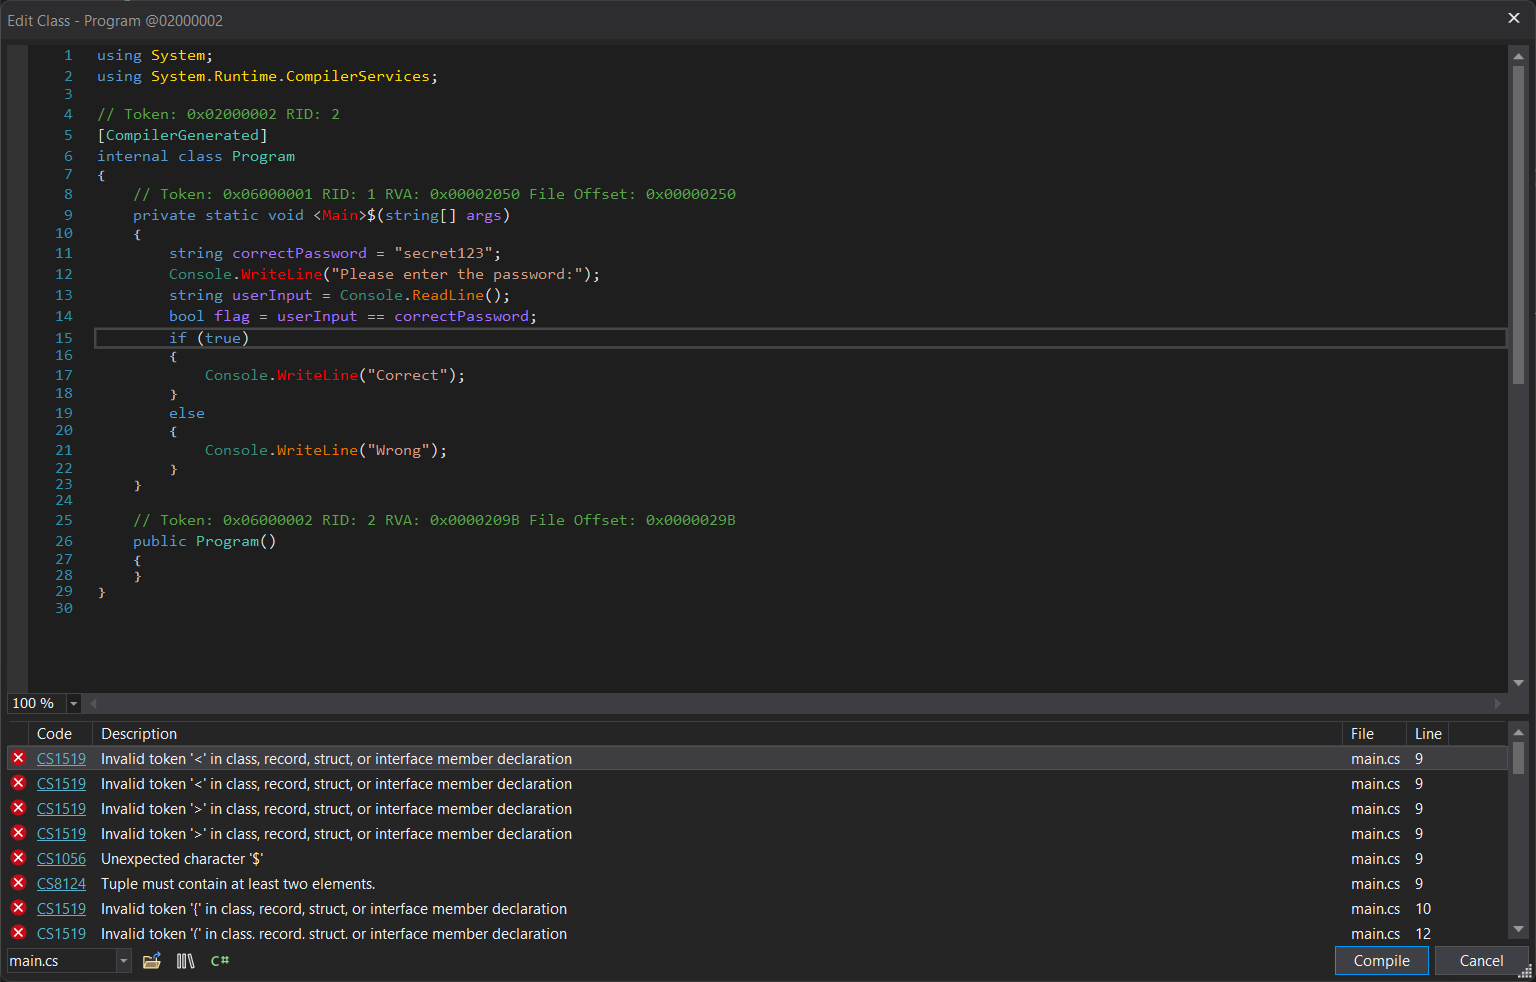
We see there are lots of compilation errors. This happens often because the compilation/decompilation artifacts that have been generated for us to see.
Avoiding compiler errors
To explain this, we should think about how other decompilers work. Imagine were dealing with a C program that we are reverse engineering with Ghidra. The code we would see is a reconstruction called pseudo-code, which aims to provide a general idea of what is going on, but by no means should be thought as precise or even valid. When we are not sure of what happens even with pseudo-code, we would look directly into the disassembly. In the .NET framework context, there is no assembly code, but instead a Java-like intermediate language (also called bytecode) called Common Intermediate Language (CIL) or Microsoft Intermediate Language (MSIL, used by Windows Defender definitions) which, just like Java, aims to provide multi platform code that should be re-compiled at runtime by the .NET virtual machine. The reference to the CIL instructions can be found here.
Lets dig into the bytecode and find what we need to change. To do this, we need to change the disassembly mode from C# to IL with C#, which will provide a disassembly with the decompilation as reference.
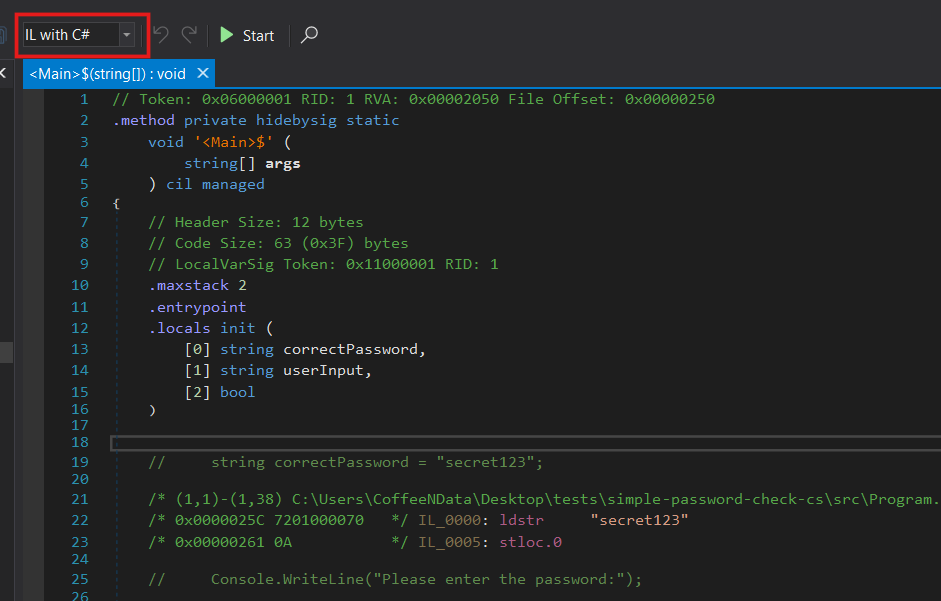
The resulting code looks like this:
.method private hidebysig static
	void '<Main>$' (
		string[] args
	) cil managed
{
	.maxstack 2
	.entrypoint
	.locals init (
		[0] string correctPassword,
		[1] string userInput,
		[2] bool
	)


	//     string correctPassword = "secret123";
	IL_0000: ldstr     "secret123"
	IL_0005: stloc.0

	//     Console.WriteLine("Please enter the password:");
	IL_0006: ldstr     "Please enter the password:"
	IL_000B: call      void [System.Console]System.Console::WriteLine(string)
	IL_0010: nop

	//     string userInput = Console.ReadLine();
	IL_0011: call      string [System.Console]System.Console::ReadLine()
	IL_0016: stloc.1

	//     bool flag = userInput == correctPassword;
	IL_0017: ldloc.1
	IL_0018: ldloc.0
	IL_0019: call      bool [System.Runtime]System.String::op_Equality(string, string)
	IL_001E: stloc.2

	//     if (flag)
	IL_001F: ldloc.2
	IL_0020: brfalse.s IL_0031


	//         Console.WriteLine("Correct");
	IL_0022: nop

	IL_0023: ldstr     "Correct"
	IL_0028: call      void [System.Console]System.Console::WriteLine(string)
	IL_002D: nop

	IL_002E: nop

	IL_002F: br.s      IL_003E


	//         Console.WriteLine("Wrong");
	IL_0031: nop

	IL_0032: ldstr     "Wrong"
	IL_0037: call      void [System.Console]System.Console::WriteLine(string)
	IL_003C: nop

	IL_003D: nop


	// }
	IL_003E: ret
} // end of method Program::'<Main>$'
Lets focus on this specific code segment:
	//     if (flag)
	IL_001F: ldloc.2
	IL_0020: brfalse.s IL_0031


	//         Console.WriteLine("Correct");
	IL_0022: nop

	IL_0023: ldstr     "Correct"
	IL_0028: call      void [System.Console]System.Console::WriteLine(string)
	IL_002D: nop

	IL_002E: nop

	IL_002F: br.s      IL_003E
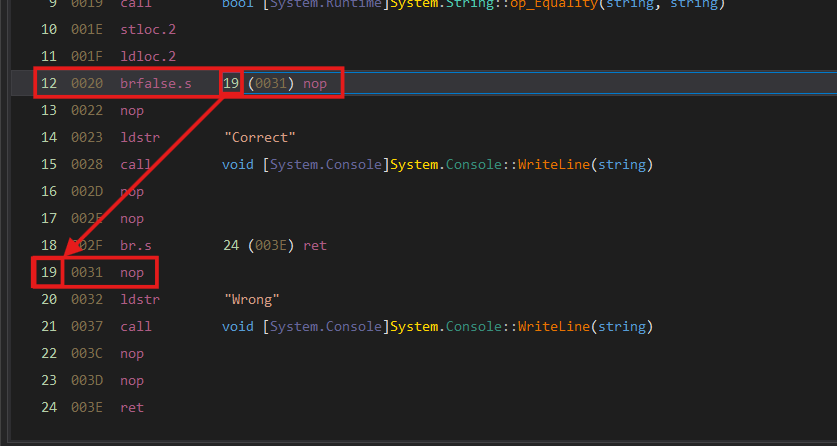
Citing the Wikipedia source above, ldloc.2 loads “local variable 2 onto stack” and brfalse.s branches “to target if value is zero”. This last instruction is equivalent to a JNE in x86 assembly. Keep the reference at hand to improve our understanding of the code segments.
At this point, it checks if flag variable is set to false. If so, it then skips the code shown after the conditional. To reach the below code, we might want to use one of these two approaches:
- Redirect the branch to jump to IL22 to never fail.
- Force the conditional to always return true.
I personally will be choosing the option one, but option 2 will look cleaner and more elegant in some cases.
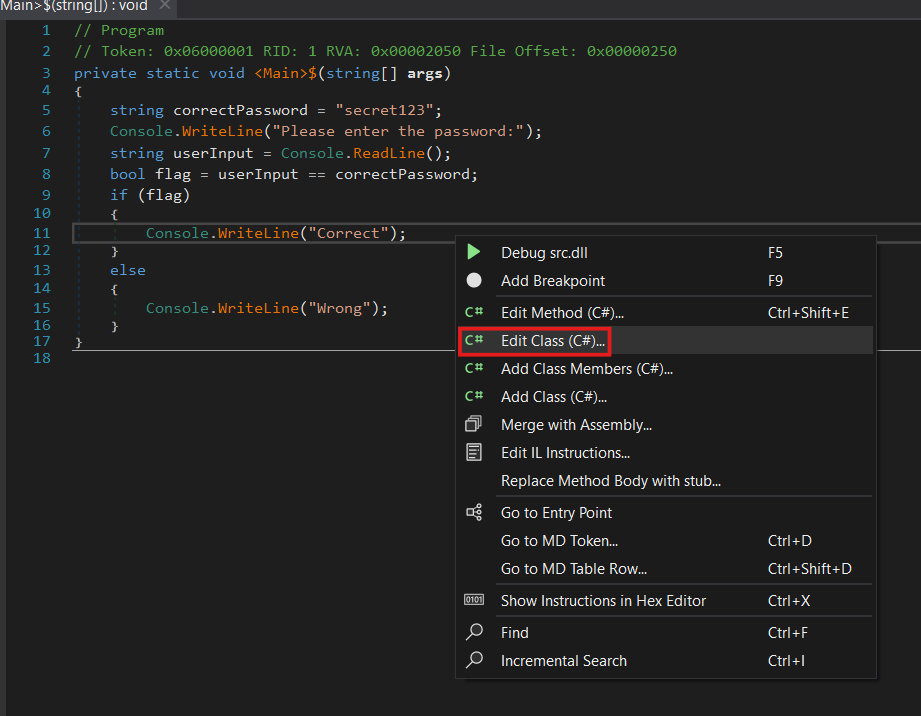
Now, we right click the code and select “Edit IL instructions”:

Here, the disassembly is a bit cleaner. We see which exact instruction the brfalse.s conditional is going to jump to after being run.
Just by changing this to a 13, which points to a nop in the code path we want to follow, we will force the code to simply never fail the password check by always forcing a jump. Modifying this in dnSpy is very easy. To modify where to jump, dnSpy provides a drop-down menu to select the target instruction. We select line 13.
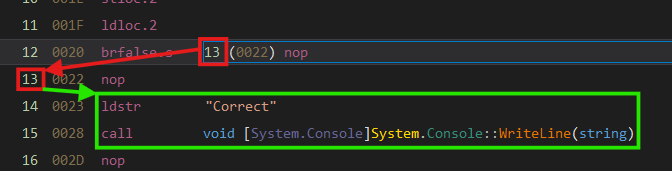
Now we can see we successfully redirected the code. Since we have not used pseudo-code or decompilation, it successfully recompiles with the patched instruction. As a personal recommendation, always patch as less instructions as possible and try to use the IL editor instead of the C# view. This will often result in more stable, cleaner and better working patched binaries.
Finishing up
To save the patched result, we go to “File” > “Save Module”.
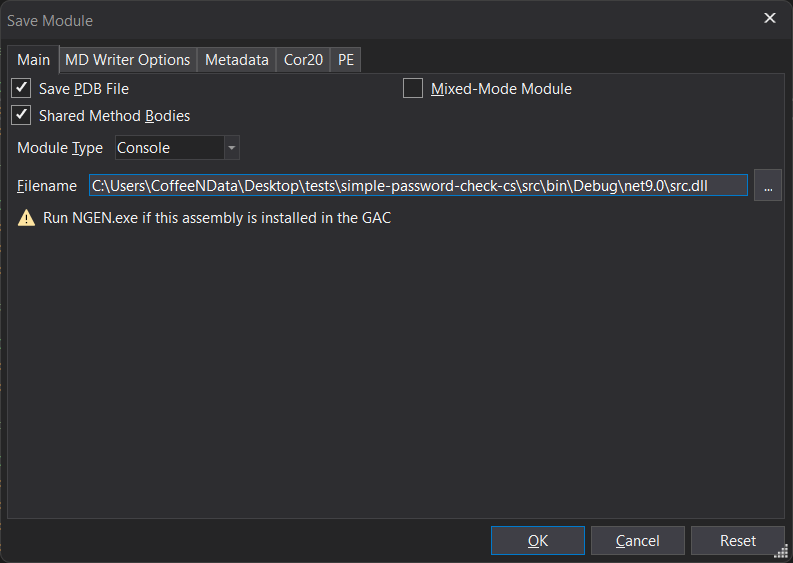
Saving a PDB file would be useful if we needed further debugging, but its not the case, so we uncheck that option and click OK to save the patched binary.
Lets now run it:
> .\src.exe
Please enter the password:
> wrongpassword12345
Correct
It now works even with a wrong password.
Conclusion
This aims to be an introduction for the next post, as it will deep dive into how .NET bundles work, how to extract them and how to patch them without dying trying.